Sunday, April 30, 2006
For long time I've been searching an easy way to read bible and to become a better man finally I found it thru gDesklet. Now, eachtime I turn on my Ubuntu, Jesus speaks to me directly on my desktop ;-)
Thursday, April 27, 2006
My GOD! Dapper Drake is AWESOME!
In a middle of night, I cannot sleep and browse few sites to get sleepy. Ubuntu site is one of my target site, usually I go directly to wiki.ubuntu.com to get some clue of my problems, but because there are no problems I try to browse another. Browse after browse, finally I came to page where Dapper Drake test for next version. My eyes couldn't blink at all, all I found there makes me cannot sleep ;-) I cannot wait to try, I cannot wait to order FreeCD, I cannot wait to tell and to show to my friends. But, it's 2.28 am so it would be better that I just dreaming using Dapper Drake.
See by yourself : Click Here
Wednesday, April 26, 2006
3D File Manager
If you saw Jurrasic Park movie (not The Lost World or Jurrasic III) you will see Lex operate computer with 3D filemanager. It was shocking me, because that time my computer only run Windows 98. She told that it was UNIX system. Wow!
Today, I just found what Lex did on Jurrasic Park, just simply install tdfsb :
# sudo install tdfsb
# tdfsb
and here is my 'Jurrasic Park' desktop:
Today, I just found what Lex did on Jurrasic Park, just simply install tdfsb :
# sudo install tdfsb
# tdfsb
and here is my 'Jurrasic Park' desktop:
Sunday, April 23, 2006
Easter Egg
Well, it's little bit late but better late then never, right? Here is some of easter egg found on my Breezy box:
1. Mozilla
Type about:mozilla on URL field then press enter. You will see some of
phrase from The Book of Mozilla 7:15
2. OpenOffice Calc 2.0
Type Game("StarWars") in any cell, then press enter. Surprise!!!
3. Apt-get
Anyone who has used a Debian based system is probably aware of APT's supercow powers. If you type "apt-get" in a terminal and press ENTER, you'll notice a message at the bottom that says "This APT has Super Cow Powers". When you type "apt-get moo", you'll get a message asking "Have you mooed today?"
If you try the same in aptitude, you get the message "There are no Easter Eggs in this program". Of course, it's lying! Try a "aptitude -vv moo", then "aptitude -vvv moo", increasing the v's which usually means verbosity. Aptitude will eventually give up and give you an Egg :)
4. Ubuntu Names
# zcat /usr/share/doc/linux-image-`uname -r`/changelog.Debian.gz | egrep -e "Release"
#
zgrep "The.*Release" /usr/share/doc/dpkg/changelog.Debian.gz
Hierarchichal Token Bucket
Want to control your internet traffic? use HTB! Before start configuring, you must know your internet bandwidth, both uplink and downlink. In this example my uplink 64 Kbps and 384 Kbps for downlink. So, let's we start.
Step 1: Get it what you needGo to Sourceforge.net and download htbinit-xx.x.y, put it on /etc/init.d/. Usually I change its name become htbinit only.
Step 2: Becoming daemon
after you put in /etc/init.d then change permission to 755 and make it as a daemon.
# sudo update-rc.d htbinit defaults
Step 3: Shape your client's bandwidth
Create directory /etc/sysconfig/htb/ and write this into files:
===============
eth0
R2Q=1
eth0-10.root
RATE=64Kbit
BURST=15k
eth0-10:10.www
RATE=64Kbit
BURST=15k
LEAF=sfq
RULE=*:80,
eth0-10:20.smtp
RATE=56Kbit
CEIL=64Kbit
BURST=15k
LEAF=sfq
RULE=*:25,
eth0-10:30.others
RATE=4Kbit
CEIL=8Kbit
BURST=15k
LEAF=sfq
===============
eth1
R2Q=1
eth1-10.root
RATE=384Kbit
QUANTUM=15k
eth1-10:20.cpu01
RATE=32Kbit
QUANTUM=15k
CEIL=64Kbit
LEAF=sfq
RULE=192.168.0.1/32
eth1-10:30.cpu02
RATE=64Kbit
QUANTUM=15k
CEIL=128Kbit
LEAF=sfq
RULE=192.168.0.2/32
===============
Step 4: Finally, start your htbinit
# sudo /etc/init.d/htbinit compile
# sudo /etc/init.d/htbinit start
Saturday, April 22, 2006
SRG: Squid reporting tool
Some of my friends ask me how they can check sites on Squid cache. At the first time I little bit confuse, not because of I cannot do it but because there are a lot of program for displaying Squid log. After search and test, I decide to use SRG (found on freshmeat but install using synaptic). Just do:
# sudo apt-get install srg
after finish, edit your /etc/srg/srg.conf:
log_file "/var/log/squid/access.log"
and left the other as default. Then, to make it viewable from web browser do:
# sudo srg -C /etc/srg/srg.conf
Finally, open your web browser and type http://127.0.0.1/srg_reports/. Try it!
# sudo apt-get install srg
after finish, edit your /etc/srg/srg.conf:
log_file "/var/log/squid/access.log"
and left the other as default. Then, to make it viewable from web browser do:
# sudo srg -C /etc/srg/srg.conf
Finally, open your web browser and type http://127.0.0.1/srg_reports/. Try it!
Saturday, April 15, 2006
Glade, PyGTK, Python: Perfect Combination
Step 1: Install following program
# sudo apt-get install glade-2 python-glade2
Step 2: Create interface
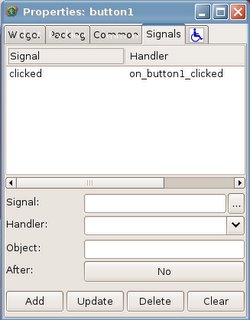
Run your Glade, Application > Programming > Glade then simply add a button in a new GTK+ Window. There should be like this:
Add handler (on_button1_clicked) and signal (clicked) on properties.
save it, and ready to write Python code.
Step 3: Writing Python code
#!/usr/bin/python
import gtk
import gnome.ui
import gtk.glade
APPNAME="Hello"
APPVERSION="1.0"
class WidgetWrapper:
def __init__(self):
gnome.init(APPNAME, APPVERSION)
self.widgets = gtk.glade.XML("project5.glade")
self.widgets.get_widget("window1")
signalDic = { "on_button1_clicked" : self.on_button1_clicked }
self.widgets.signal_autoconnect(signalDic)
def on_button1_clicked(self, widget):
print "I'm success person"
if __name__ == "__main__":
Widgets = WidgetWrapper()
gtk.mainloop()
Step 4: Run it
Save your Python code in same directory with Glade project files. Give some name, hello.py for example then chmod 755 hello.py, run it. There would be "I'm success person" each time the button clicked. Try it!
Twin letter on each Ubuntu version
Did you realize that every version of Ubuntu contain same letter?
Here is some example:
04.10 Warthy Warthog ( double W )
05.04 Hoary Hedgehog ( double H )
05.10 Breezy Badger ( double B )
06.04 Dapper Drake ( double D )
06.10 ... ?
Funny, huh? Is this somekind of Ubuntu tradition? Ask Mark . . .
Here is some example:
04.10 Warthy Warthog ( double W )
05.04 Hoary Hedgehog ( double H )
05.10 Breezy Badger ( double B )
06.04 Dapper Drake ( double D )
06.10 ... ?
Funny, huh? Is this somekind of Ubuntu tradition? Ask Mark . . .
Friday, April 14, 2006
gDesklets: eye-candy for Gnome
Do you know SuperKaramba? It runs on KDE, now try gDesklets.
Just simply install using apt-get:
# sudo apt-get install gdesklets
Then run it from Application > Accessories > gDesklets.
Need something on your Gnome? download from www.gdesklets.org, choose whatever you like.
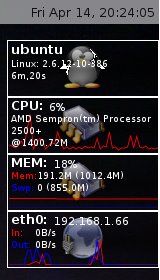
and here's what I've done:
Just simply install using apt-get:
# sudo apt-get install gdesklets
Then run it from Application > Accessories > gDesklets.
Need something on your Gnome? download from www.gdesklets.org, choose whatever you like.
and here's what I've done:
Thursday, April 13, 2006
AptMove: add programs without internet
Step 1: Install the apt-move package
Apt-move is a tool for creating a debian package repository file structure out of packages that have been downloaded to /var/cache/apt/archives. Installed packages are downloded there by apt for installation. Apt-move will create this local repository in /mirrors/debian, by default.
sudo apt-get install apt-move
(Or just use synaptic) You need to enable the universe repository. See AddingRepositoriesHowto
I change the setting in /etc/apt-move.conf from
COPYONLY=no
to
COPYONLY=yes
So that apt-move doesn't delete file from your /var/cache/apt/archives/.
Step 2: Select the packages you want to put on the cd
In this example, we only want to put freshly downloaded packages. We don't want to put old packages or packages that exist in Ubuntu CD.
First, we clean up the /var/cache/apt/archives from old packages.
sudo apt-get autoclean
Next, we delete packages that exists in the Ubuntu CD. Put your Ubuntu CD on CD-ROM Drive, mount it (if it not automatically mounted) then run the following:
for f in `find /media/cdrom/pool/ -name '*.deb' -printf %f\\n`
do
if [ -f /var/cache/apt/archives/$f ]; then
sudo rm -v /var/cache/apt/archives/$f
fi
done
Step 3: Run apt move to create the archive structure
Make sure you have enough disk space first.
Because /mirrors/debian is root owned we must become root to make the steps easier.
sudo -s
All the following command run as root. First we clean-up previous mirrors (if exists) then we run apt-move.
rm -rf /mirrors/debian
apt-move -d breezy update
Because ubuntu repository structure, not all packages are inserted into the Packages.gz file by apt-move. We must remake Packages.gz with the help of apt-ftparchive.
cd /mirrors/debian
apt-ftparchive packages pool/main/ \
| gzip -9c > dists/breezy/main/binary-i386/Packages.gz
apt-ftparchive packages pool/restricted/ \
| gzip -9c > dists/breezy/restricted/binary-i386/Packages.gz
We must also remake Release file, to do this we must make an apt configuration file named ~/myapt.conf it contents is like this
APT::FTPArchive::Release {
Origin "APT-Move";
Label "APT-Move";
Suite "breezy";
Codename "breezy";
Architectures "i386";
Components "main restricted";
Description "Ubuntu Updates CD";
};
Next, run the following commands:
rm dists/breezy/Release
apt-ftparchive -c ~/myapt.conf release dists/breezy/ > Release
mv Release dists/breezy/Release
Then we need to make Release.gpg, to make it you must already have your GPGKey set and ready to sign.
gpg -bao dists/breezy/Release.gpg dists/breezy/Release
Next, we delete unwanted .apt-move directory
rm -rf .apt-move
You can identify the cd by making a .disk directory and making an info file in it.
mkdir .disk
echo Ubuntu-Updates `date +%Y-%m-%d` > .disk/info
Then we need to put our public keys in it.
gpg --export -a "Your Name" > public.key
Offcourse change Your Name with the name that you use in your PGP.
Thats' all
exit
Step 4: Burn the cd
Copy the contents of what is contained in /mirrors/debian to a cd.
For example you could make an iso by following command:
mkisofs -r -A "Ubuntu Updates `date +%Y%m%d`" -o ubuntu-updates.iso \
/mirrors/debian
Before you could use the CD, you need to add our GPG key to apt GPG keys. Put the CD on CD-ROM Drive, mount it (if it not automatically mounted) then run the following:
apt-key add /cdrom/public.key
Then you could use the CD like any other Ubuntu CD. On a non-networked ubuntu machine, you can run synaptic, insert the cd and go into Synaptic -> Edit -> Add Cdrom and it will add the contents of the cd to your repositories.
You can also do it from the command-line with
sudo apt-cdrom add
Monday, April 10, 2006
XMMS: Full Bass & Treble config
edit file /home/breezy/.xmms/menurc:
Preamp = -1.11022e-15
Band0 = 7.2
Band1 = 5.6
Band2 = -1.11022e-15
Band3 = -7.2
Band4 = -4.8
Band5 = 1.6
Band6 = 8
Band7 = 11.2
Band8 = 12
Band9 = 12
Enjoy your music!
Preamp = -1.11022e-15
Band0 = 7.2
Band1 = 5.6
Band2 = -1.11022e-15
Band3 = -7.2
Band4 = -4.8
Band5 = 1.6
Band6 = 8
Band7 = 11.2
Band8 = 12
Band9 = 12
Enjoy your music!
Ampuhnya iptables
#!/bin/sh
iptables -t nat -F
iptables -t nat -A PREROUTING -i eth1 -p tcp --dport 80 -j REDIRECT --to-port 8080
gid=`id -g proxy`
iptables -t nat -A OUTPUT -p tcp --dport 80 -m owner --gid-owner $gid -j ACCEPT
iptables -t nat -A OUTPUT -p tcp --dport 80 -j DNAT --to-destination 192.168.1.64:8080
iptables -t nat -F
iptables -t nat -A PREROUTING -i eth1 -p tcp --dport 80 -j REDIRECT --to-port 8080
gid=`id -g proxy`
iptables -t nat -A OUTPUT -p tcp --dport 80 -m owner --gid-owner $gid -j ACCEPT
iptables -t nat -A OUTPUT -p tcp --dport 80 -j DNAT --to-destination 192.168.1.64:8080
Script Dashyat!
acl download url_regex -i ftp .3gp .avi .bin .bz2 .com .deb .exe .gz .iso .lzh .mid .mov .mp3 .mpeg .mpg .msi .ogg .pdf .ram .rar .raw .rm .rpm .tar.gz .tgz .tar .wav .wmv .vqf .vob .zip
delay_pools 1
delay_class 1 1
delay_parameters 1 15000/5000
delay_access 1 allow download
delay_pools 1
delay_class 1 1
delay_parameters 1 15000/5000
delay_access 1 allow download
Nginstall Transparan Proxy ah...
Caranya begini, turuti saja, gak usah macem-macem soalnya ini sudah terbukti dan teruji.
# sudo apt-get install squid adzapper
edit file /etc/squid/squid.conf :
http_port 8080
redirect_program /usr/bin/adzapper.wrapper
httpd_accel_host virtual
httpd_accel_port 80
httpd_accel_with_proxy on
httpd_accel_uses_host_header on
http_access allow all
setelah itu save dan edit file /etc/adzapper.conf :
ZAP_MODE="CLEAR"
lalu buat script iptables di /etc/init.d/iptables-squid yang isinya adalah:
#!/bin/sh
iptables -t nat -A PREROUTING -i eth0 -p tcp --dport 80 -j REDIRECT --to-port 8080
iptables -t nat -A POSTROUTING --jump MASQUERADE --source 192.168.0.0/24
simpan, lalu chmod 755 iptables-squid. Jadikan daemon dengan cara:
# sudo update-rc.d iptables-squid defaults
# sudo /etc/init.d/squid restart
Jangan lupa edit /etc/network/options sehingga jadi seperti ini:
ip_forward = yes
spoofprotect = yes
syncookies = no
dan yang terakhir adalah:
# sudo sh -c 'echo 1 > /proc/sys/net/ipv4/ip_forward'
Selesai.
Saturday, April 08, 2006
Awalnya...
Aku tuh orangnya paling suka utak-atik Linux, apalagi kalau ada distro baru yang punya fitur unik. Pertama kenal Linux aku pake RedHat 6.0 (1999), waktu itu yang ngetrend baru SuSE dan Mandrake. Tapi aku pilih RedHat karena buku-bukunya lebih banyak, jaga-jaga saja kalau ada binggungnya kan yang nolongin banyak.
Terus waktu berjalan, install macem-macem dari 3 CD RedHat itu doank. Jaman itu internet masih mahal dan lambat, mau download jadi mikir 2-3 kali. Aku jalani kehidupan Linux-ku hingga RedHat 8.0 saja. Setelah 'cerai' dengan RedHat aku pakai Mandrake karena ada fitur urpmi yang bikin proses install lebih mudah. Pake Mandrake tidak begitu lama juga, karena aku ngerasa jadi orang banci, lah wong semuanya sudah dibikin mudah. Terus apanya yang bisa dipelajari? Tapi aku akui Mandake kalau urusan tampilan memang no. 1! Top abisss!!!
Tahun 2005 kemarin pas aku nelpon temen, dia kenalkan Ubuntu. Aku ketawa abis, soalnya namanya lucu. Malah ada yang bilang Usus Buntu :-))
Tapi cuek aja, aku coba install dan ternyata interface-nya lumayan bagus. Baru kali ini aku pakai Gnome sebagai default desktop environment, biasanya sih pake KDE atau BlackBox. Kesan pertama sih biasa saja, tapi pas mau install mc (midnight commander), aku kaget banget. Tinggal ketik:
$ sudo apt-get install mc
cuman gitu doank. Dalam hati aku bilang, "nah ini dia yang aku cari selama ini!"
Setelah sekian lama utak-atik Ubuntu dan menghasilkan 'karya penting' aku binggung untuk nympan dokumentasinya. Selama ini aku simpen di email, sekarang aku mau coba nulis apa yang pernah aku perbuat bersama Ubuntu di sini...